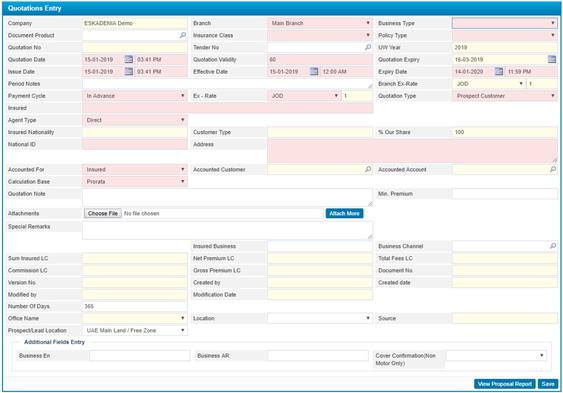
To create a
quotation, click![]() in the Quotations List block
and then go through the following steps:
in the Quotations List block
and then go through the following steps:
§ The Company Name will be automatically displayed by the system according to the Company of the user who has logged into the system;
§ Select the Branch of the company;
§ Select the Business Type (Direct, Inward, Coinsurance Leading or Coinsurance Follower);
§ Select the Document Product from a list of pre-defined document products.
§ Select the Insurance Class from a list of insurance classes that were defined in the Insurance Classes page located in the Insurance Setup module. Note that the list will be filtered according to the Business Type selection it belongs to;
§ Select the Policy Type from a list of policies that were defined in the Insurance Classes page. Note that the list will be filtered according to the Insurance Class selection it belongs to;
§ The Quotation Number will be given by the system upon saving;
§ Select the Tender Number from a list of active tenders. Note that tenders are defined in the Package Tenders page in the Renewal sub-module;
§ The Underwriting Year will be given by the system;
§ Enter the Quotation Date and time;
§ Enter the Quotation Validity in days. For example; if you enter 14 then the quotation will be valid for 14 days from the quotation date;
§ The Quotation Expiry date will be automatically displayed by the system according to the Quotation Validity;
§ Enter the Issue Date and time of the insurance period;
§ Enter the Effective Date and time of the insurance period;
§ Enter the Expiry Date and time of the insurance period;
§ Enter the Periods Notes:
§ The Branch Exchange Rate is auto retrieved by the system;
§ Select the Payment Cycle (Annual, Semi-annual, Quarterly or Monthly);
§
Select the Exchange Rate.
Notice that the exchange rate consists of two fields; the currency and
the exchange rate. Once you choose the currency, the exchange rate will be
displayed.
§
Enter the Quotation Type
(Customer or Prospect Customer). If ‘Customer’ is selected then, in the Insured
Field, the system will retrieve all customers defined in the ESKA® Business Manager system.
Select the name of the customer you want. Accordingly, the system will automatically
retrieve the agent name and commission percentage. If ‘Prospect Customer’ is
selected then you need to manually enter the name of the customer in the Insured
field and enter the National ID and the Address of the
insured person. Note you can Add More Than One Insured Customer;
§ Select the Agent Type (Direct, Agent, Sales Person or Broker);
· Note: if the agent type is Agent, the Agent Commission Percentage field will appear where you need to enter the Agent Commission %;
·
If the selected Agent Type
was ‘Agent’, ‘Sales Person’ or ‘Broker’, then you need to select the Agent/Broker
name. Accordingly, the system will retrieve the Agent Commission Percentage.
However, if the selected Agent Type was ‘Direct’ then this field will be
hidden.
§ The Insured Nationality, Customer Type and the Percentage Our Share will be auto-generated by the system;
§ Select the Beneficiary of this claim, who is the person or persons designated by the policyholder to receive the proceeds of an insurance policy upon the death of the insured. The policyholder can name both a primary and secondary beneficiary;
§ Select the account that will be affected with the financial transactions in the Accounted For field (Insured, Agent or Beneficiary);
§ Select the Accounted Customer;
§ Select the Accounted Account;
§ Select the Calculation Base;
§ Enter any necessary notes in the Quotation Notes field;
§ Enter the Minimum Premium;
§
To attach any important
files, click![]() to
select the path of the file and then click
to
select the path of the file and then click![]() to
attach the file. To add
more than one attachment, keep repeating this step. You
can view the list of files in the Attachments tab located at the bottom
of the page;
to
attach the file. To add
more than one attachment, keep repeating this step. You
can view the list of files in the Attachments tab located at the bottom
of the page;
§ Enter any Special Remarks;
§ Enter the Insured Business;
§ Select the Business Channel;
§ The following fields will be auto-generated by the system once you save the quotation: (Sum-Insured LC, Net Premium LC, Total Fees LC, Commission LC, Gross Premium LC, Document Number, Version Number, Created By, Created Date, Modified By, and the Modified Date)
§ The Number of Days is auto-generated by the system based on the Effective Date and Expiry Date, however, you can change it if needed, and accordingly, the Expiry Date will be changed by the system;
§ Select the Calculation Bases (Short Period, Prorate or Full Premium):
- If ‘Prorate’ is selected then the system will calculate the premium amount based on the number of days within the insurance period;
- If ‘Short-Period’ is selected then the system will calculate the premium amount according to the short-period table that was defined through the Short-Period Premium page located in the Covers Premium sub-module;
- If ‘Full Premium’ is selected then the system will calculate the premium amount as the rate of the sum insured regardless of the period.
§ The remaining fields are read-only. Initially, these fields are left empty. However, upon finalising the policy and going through the rest of the sub-module pages the fields will be filled.
§
Click ![]()
§
Click ![]()