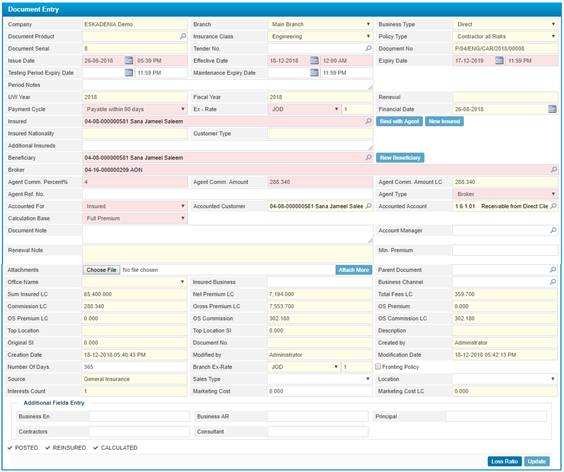
To prepare the initial information of a Policy, you need to do the following:
§ The Company Name will be given by the system according to the Company of the user who has logged into the system;
§ Select the Branch of the company;
§ Select the Business Type (Direct, Inward, Coinsurance Leading or Coinsurance Follower). If you select the “Coinsurance Leading’ business type, then you need to specify the coinsurance companies;
· If ‘Inward” is selected then the following will occur based on a preference;
o The Insured field will be disabled,
o The Leading Company must be selected, accordingly, the Insured field will be auto-selected to be the same as the Leading Company;
o The Accounted For will be auto-selected by the company to be the same as the Inward;
§ Select the Document Product from a list of products that were defined in the Products page located in the Insurance Setup sub-module. Accordingly, the system will retrieve the Insurance Class and Policy Type of that product;
· If this field was left empty, then you need to select the Insurance Class from a list of insurance classes that were defined in the Insurance Classes page located in the Insurance Setup sub-module;
· Select the Policy Type from a list of policies that were defined in the Insurance Classes page. Note that policies will be filtered according to your insurance class selection;
§ The Document Serial number will be given by the system upon saving the policy;
§ Select the Tender Number from a list of active tenders. Note that tenders are defined in the Package Tenders page located in the Renewal sub-module;
§ The Document Number will be given by the system upon saving the policy;
§ Enter the Issue Date and time of the policy;
§ Enter the Effective Date and time of the policy. This date is the date on which the policy becomes valid;
§ Enter the Expiry Date and time of the policy. This date is the date on which the policy loses its validation;
§ Enter the Period Notes description;
§ The Underwriting Year and Fiscal Year are displayed by the system;
§ The system will display the renewal number of the renewed policy in the Renewal field;
§ Select the Payment Cycle from a list of cycles that were previously defined through the Payment Cycle page of the Production Setup sub-module located in the Insurance Setup module;
§ Select the Exchange Rate. Notice that the exchange rate consists of two fields; the currency and the exchange rate. Once you choose the currency, the exchange rate will be displayed.
§ The Financial Date will be automatically displayed by the system according to the effective date of the policy. This date will represent the voucher date for this policy;
§ Select the Insured name from the predefined list;
§
Click ![]() to bind the insured person to an agent;
to bind the insured person to an agent;
§
If you do not want to
select an existing customer, you can add an entirely new insured person to the
system by clicking![]() ;
;
§ The Insured Nationality and Customer Type will be automatically retrieved from the system;
§ Enter any Additional Insured if available ‘As a text;
§
Select the Beneficiary
name. you can add
an entirely new beneficiary to the system by clicking on![]() ;
;
§ Select the Agent;
§ Enter the Agent Ref. No;
§ Select the Agent Type (Direct, Agent, Sales Person or Broker);
§ If you select any agent type except for ‘Direct’, you need to select the Agent/Salesman/Broker name.
§ Select the party that will be held Accounted For (Insured, Beneficiary, Agent or Broker), the system displays the Accounted Customer and Accounted Account based on your selection;
§ Select the Calculation Bases (Short Period, Prorata or Full Premium):
· If ‘Prorata’ is selected then the system will calculate the premium amount based on number of days within the policy period;
·
If ‘Short-Period’ is
selected then the system will calculate the premium amount according to the
short-period table that was defined through the Short-Period Premium page
located in the Covers
Premium sub-module;
·
If
‘Full Premium’ is selected then the system will calculate the premium amount as
the rate of sum insured regardless of the period.
§ Select the Collector Name ;
§ Enter any necessary Document Notes and Renewal Notes;
§
To attach any important
files, click![]() to
select the path of the file you want to attach. Click
to
select the path of the file you want to attach. Click ![]() to add more than one attachment;
to add more than one attachment;
§ Select a Parent Policy if you want to create a policy hierarchy where this policy will fall under another policy;
§ The remaining fields are auto retrieved from the system. After adding interests and covers to the policy and then calculating premiums these fields will be filled;
§ The Number of Days is auto-generated by the system based on the Effective Date and Expiry Date, however, you can change it if needed, and accordingly, the Expiry Date will be changed by the system;
§
Click ![]() to
save your work, accordingly, the below pop-up appears displaying the Number of
days for the policy to be expired;
to
save your work, accordingly, the below pop-up appears displaying the Number of
days for the policy to be expired;

- Note: if you added a policy with Marin Cargo Insurance Class and Marine Cargo Open Cover Policy Business Type, and the selected business cover was (Minimum of deposit/ or Minimum Deposit) then the Deposit Percentage field will appear;
- Moreover, you will be able to reinsure the open cover policies based on a preference;