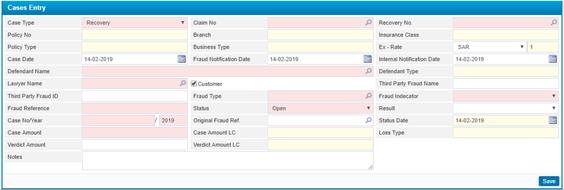
To add a court case, click ![]() and then go through the following steps:
and then go through the following steps:
§ Select the Case Type (Recovery or Claim);
§ Select the Claim Number. Claims can be defined through Claims Entry page;
§ Accordingly, the Policy Number, Branch, Insurance Class, Policy Type and Business Type will be automatically retrieved by the system;
§ The Exchange Rate will be retrieved by the system. Notice that the exchange rate consists of two fields; the currency and exchange rate. However, you may change the Currency. Accordingly, the system will retrieve the exchange rate for the selected currency;
§ The Case Date will be set to the date of entry. However, you may change it if you want;
§ Enter the Court Notification Date
§ Enter the Internal Notification Date
§ Select the Claimant Name;
§ Enter the Lawyer Name;
§ If the lawyer is customer, check the Is Customer checkbox so you can select the Lawyer Name from the predefined list;
§ Enter the Lawyer File Number;
§ Enter the Third Party Lawyer;
§ Select the Court Name from a list of court names that were previously defined through the Codes page;
§ Select the Court Degree (Court of First, Court of Appeal or Court Cassation);
§ Enter the Court Reference;
§ Select the Status of the court case (Open or Closed);
§ Select the Result (Won or Lost);
§ The Case Number/Year consists of two fields. In the first field enter the case number. The second field will be set to the year of entry;
§ If the court case you are entering is originally related to a previous court case then you need to select the Original Court Reference from a list of previously defined court cases;
§ Enter the Case Amount;
§ The Status Date will be set to the entry date of the court case.
§ The Case Amount in Local Currency will be displayed upon saving the court case;
§ The Loss Type will be displayed upon saving the court case;
§ Enter the Verdict Amount;
§ The Verdict Amount in Local Currency will be displayed upon saving the court case;
§ Enter any necessary Notes;
§
Click ![]() to save your work.
to save your work.