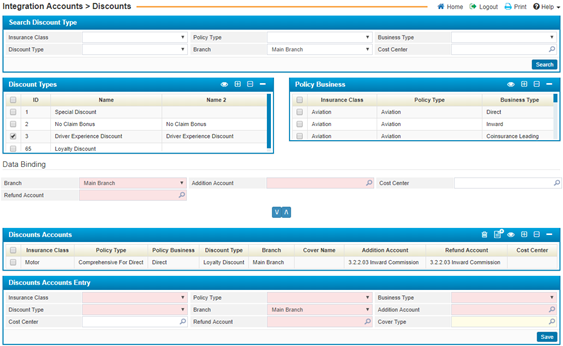
In the Discount page, you can link together each Discount Type with a Policy Business and define to which Addition Account the Discount amount should be added;
To inquire about certain previously added Discount Types, you
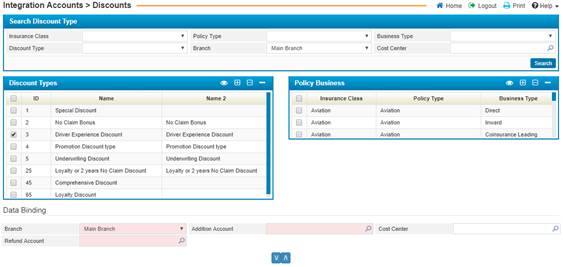
need to fill in the searching criteria at the top of the page by specifying the
fields (Insurance Class, Policy Type... etc.) you are searching for and click![]() .
Where the matching results will be displayed in the below figure:
.
Where the matching results will be displayed in the below figure:

To link together a discount type of each claimant type with a policy business and to set an account, you need to perform the following steps:
§ Check-in the checkbox corresponding to the Discount
Types listed in the Discount Types block. Similarly, check-in
the checkbox corresponding to the policy business listed
in the Policy Business block;
§ In the Data Binding
section; select the Branch, Addition Account, Cost Center,
and the Refund Account;
§ Click
on ![]() to move your
selection into the Claim Accounts block.
to move your
selection into the Claim Accounts block.
To edit any entry, select it in the Discount Accounts block
and accordingly, the entry will be displayed in the Discount Accounts Entry block
where you can make any desired changes. If you would like to add a new entry in
this block, you can click ![]() and fill out the necessary criteria.
and fill out the necessary criteria.

§ Select the Insurance Class for this flex column. Based on the insurance class you choose, the Policy Type drop-down list will be updated with the relevant values. Select the Policy Type that corresponds to this flex column;
§ Select the Business Type for this commission, These business types were predefined in the system;
§ Select the Discount Type from the predefined list;
§ Select the Branch where this discount will be used
§ Select the Addition Account;
§ Select the Cost Center;
§ Select the Refund Amount;
§ Select the Cover Type;
§
Once you have finished,
click ![]() to save the changes
to save the changes