To add a claim, click ![]() in the Claims List block and then go
through the following:
in the Claims List block and then go
through the following:

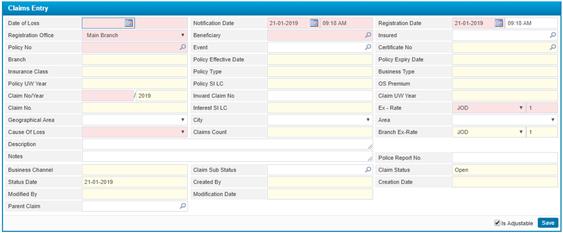
§ Enter the Date of Loss and time. This date represents when the actual damage took place. The Date of Loss needs to be within the effective period of the policy.
§ Enter the Notification Date and time of the claim; Note that the notification date should be greater than or equal to the loss date;
§ Enter the Registration Date and time of the claim; as when the claim is actually registered in the system;
§ Select the Registration Office from the predefined list;
§ Select the Beneficiary of this claim, who is the person or persons designated by the policyholder to receive the proceeds of an insurance policy upon the death of the insured. The policyholder can name both a primary and secondary beneficiary;
§ Select the Insured person of this claim, who is party who is being insured;
Note: selecting the insured will clear the beneficiary field and vice versa;
§ Select the Policy No. for this claim;
§ Choose the Event from the predefined list ;
§ Select the Certificate Number for this claim, if this claim is occurred on the certificate only;
§ Accordingly, relevant information of the claim will be displayed
including the Branch, Policy Effective Date, Policy Expiry Date,
Insurance Class, Policy Type, Business Type, Policy Underwriting
Year, Policy SI LC, OS Premium, and
the Interest SI LC;
§ In the Claim Number/Year field, automatically the system generates the claim number for the current year;
§ The Claim UW Year, Claim Number/Year, Inward Claim Number and the Claim Segment will be stored until the rest of the sub-module pages have been completed with the claim details. Note that if the policy selected was an Inward/coinsurance follower Policy then you shall enter the original claim number in the Inward Claim Number field
§ The Claim Number will be given by the system upon saving this claim entry;
§ The Exchange Rate and currency will be automatically
displayed by the system;
§
§ Choose the Geographical Area , City and Area ;
§ Select the Cause of Loss from a list of causes that were previously defined through the Loss Causes/Results page located in the Claims setup sub-module of the General Settings module. Note that causes of loss are filtered based on the insurance class and of the claim policy selected;
§ The Claims Count field displays the latest claim count before adding this newly added claim entry;
§ The Branch Exchange Rate and currency will be
automatically displayed by the system;
§
§ Enter the Description of the claim;
§ Enter any necessary Notes;
§ The Business Channel will be auto retrieved by the system;
§ Enter the Claim Sub-Status;
§ By default the Claim Status will be set as open;
§ Accordingly the following fields will be displayed “Created
By, Creation Date, Modified By, Modification Date”;
§ Select the Parent Claim from the predefined list
§ Check the Is Adjustable checkbox if you want to include this transaction amount in the Treaty Adjustment Process, if you want to exclude this amount leave the checkbox unchecked;
§
Click ![]() to save your work. Upon saving the Claim
Interests block will appear which enables you to add damaged interests
to the claim;
to save your work. Upon saving the Claim
Interests block will appear which enables you to add damaged interests
to the claim;
§
Click ![]() to view the loss ratio summary for the
selected policy;
to view the loss ratio summary for the
selected policy;
§
Click ![]() to redirect to the Policies page and view the details of the
selected policy based on security setup defined for each user;
to redirect to the Policies page and view the details of the
selected policy based on security setup defined for each user;
§ The next step would be moving to the Claimants page.